使用prometheusrules自定义创建告警规则

介绍

首先这篇文章是跟着上一篇helm 部署prometheus-operator来的,部署完成之后,我们就需要自定义一些配置。

这篇文章主要讲解如何自定义告警规则,如何让prometheus发现他。

步骤

  1. 添加prometheusrules规则
  2. 验证

名词解释

prometheusrules,也是安装好prometheus-operator后创建的一种自定义资源,我们可以看下默认自带了哪些规则:

1
2
3
4
5
6
7
8
9
10
11
12
13
14
15
16
17
18
19
20
21
22
23
24
25
26
27
28
[root@localhost]# kubectl get prometheusrules -n monitoring
NAME AGE
prometheus-operator-me-alertmanager.rules 2d23h
prometheus-operator-me-etcd 2d23h
prometheus-operator-me-general.rules 2d23h
prometheus-operator-me-k8s.rules 2d23h
prometheus-operator-me-kube-apiserver-availability.rules 2d23h
prometheus-operator-me-kube-apiserver-slos 2d23h
prometheus-operator-me-kube-apiserver.rules 2d23h
prometheus-operator-me-kube-prometheus-general.rules 2d23h
prometheus-operator-me-kube-prometheus-node-recording.rules 2d23h
prometheus-operator-me-kube-scheduler.rules 2d23h
prometheus-operator-me-kube-state-metrics 2d23h
prometheus-operator-me-kubelet.rules 2d23h
prometheus-operator-me-kubernetes-apps 2d23h
prometheus-operator-me-kubernetes-resources 2d23h
prometheus-operator-me-kubernetes-storage 2d23h
prometheus-operator-me-kubernetes-system 2d23h
prometheus-operator-me-kubernetes-system-apiserver 2d23h
prometheus-operator-me-kubernetes-system-controller-manager 2d23h
prometheus-operator-me-kubernetes-system-kubelet 2d23h
prometheus-operator-me-kubernetes-system-scheduler 2d23h
prometheus-operator-me-node-exporter 2d23h
prometheus-operator-me-node-exporter.rules 2d23h
prometheus-operator-me-node-network 2d23h
prometheus-operator-me-node.rules 2d23h
prometheus-operator-me-prometheus 2d23h
prometheus-operator-me-prometheus-operator 2d23h

当然这些规则,你也可以在prometheus的界面上看到,具体也就是对应一个一个的rules
png1

开始

①添加prometheusrules规则

创建自定义rules文件

1
2
3
4
5
6
7
8
9
10
11
12
13
14
15
16
17
18
19
20
21
[root@localhost]# cat demo1.yaml
apiVersion: monitoring.coreos.com/v1
kind: PrometheusRule
metadata:
labels:
app: prometheus-operator
release: eve-prometheus-operator
name: testtalus-rules-1
namespace: lb6
spec:
groups:
- name: testtalus.rules
rules:
- alert: processorNatGatewayMonitor_snat_to_hight_100
expr: processorNatGatewayMonitor_snat > 100
for: 1m
labels:
severity: warning
annotations:
summary: "nat gateway {{ $labels.natgatewayid }} snat连接数过高"
description: "nat gateway {{ $labels.natgatewayid }} snat连接数大于100 (当前值:{{ $value }})"

具体的指标不解释了,这个文档一大堆,简单说下groups.name这个,就是一个组名,然后下面有很多很多的规则,比如当前processorNatGatewayMonitor_snat_to_hight_100就是testtalus.rules这个组里面的一个指标而已。

开始创建:

1
2
[root@localhost]# kubectl delete prometheusrules testtalus-rules-1 -n lb6
prometheusrule.monitoring.coreos.com "testtalus-rules-1" deleted

如果你这里报错,并且报错信息如下:

1
2
[root@localhost]# kubectl apply -f demo1.yaml
Error from server (InternalError): error when creating "demo1.yaml": Internal error occurred: failed calling webhook "prometheusrulemutate.monitoring.coreos.com": Post https://prometheus-operator-me-operator.meitu-monitoring.svc:443/admission-prometheusrules/mutate?timeout=30s: context deadline exceeded (Client.Timeout exceeded while awaiting headers)

那么在这里找答案:跳转

我的解决方案是:删除资源validatingwebhookconfigurations.admissionregistration.k8s.ioMutatingWebhookConfiguration,并且重新创建你的rules

1
2
3
4
5
6
7
8
9
10
11
[root@localhost]# kubectl get validatingwebhookconfigurations.admissionregistration.k8s.io
NAME CREATED AT
prometheus-operator-me-admission 2020-11-06T10:47:12Z
[root@localhost]# kubectl get MutatingWebhookConfiguration
NAME CREATED AT
prometheus-operator-me-admission 2020-11-06T10:47:12Z
pod-ready.config.common-webhooks.networking.gke.io 2020-02-25T13:52:06Z
[root@localhost]# kubectl delete validatingwebhookconfigurations.admissionregistration.k8s.io eve-prometheus-operator-me-admission
validatingwebhookconfiguration.admissionregistration.k8s.io "eve-prometheus-operator-me-admission" deleted
[root@localhost]# kubectl delete MutatingWebhookConfiguration eve-prometheus-operator-me-admission
mutatingwebhookconfiguration.admissionregistration.k8s.io "eve-prometheus-operator-me-admission" deleted

②验证

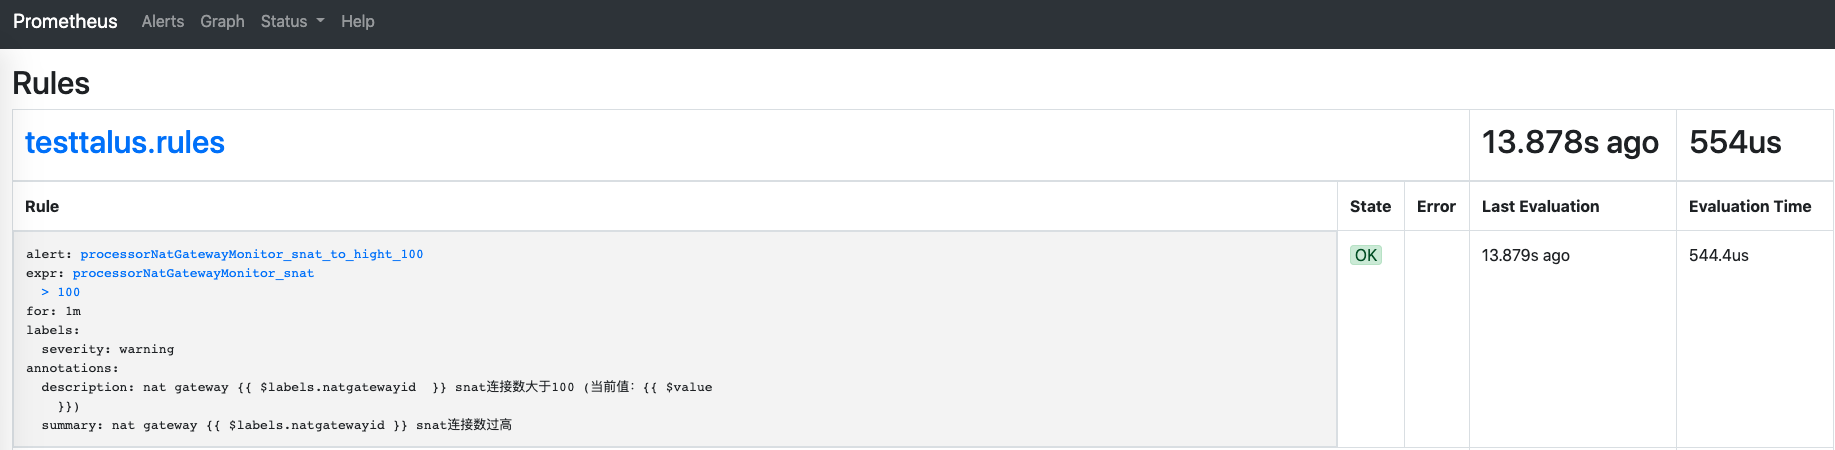
到prometheus的rules界面,你就可以看到你自定义的规则了
png2