背景 目前在做ci相关的调研,使用了tekton,发现tekton dashboard没有认证功能,自由访问。
调研 目前查到的方案,是tekton官方推出的一种方案,就是使用oauth2-proxy来做,官方文档可以点击这里:点击我
具体操作 我们主要实验两种方式:
github主要是体验一下整个配置过程,私有化部署的gitlab才是最终的选择。
我们主要分一下几个步骤来做:
安装tekton-dashboard
新增github/gitlab app
安装oauth2-proxy
配置服务暴露
测试
配置logout
开始 前置约束 我们这样规划域名:
服务
域名
tekton dashboard
tekton-dashboard.dgsfor.com
oauth2-proxy
tekton-auth.dgsfor.com
安装dashboard 1 2 $ wget https://storage.googleapis.com/tekton-releases/dashboard/latest/tekton-dashboard-release.yaml $ kubectl apply -f tekton-dashboard-release.yaml
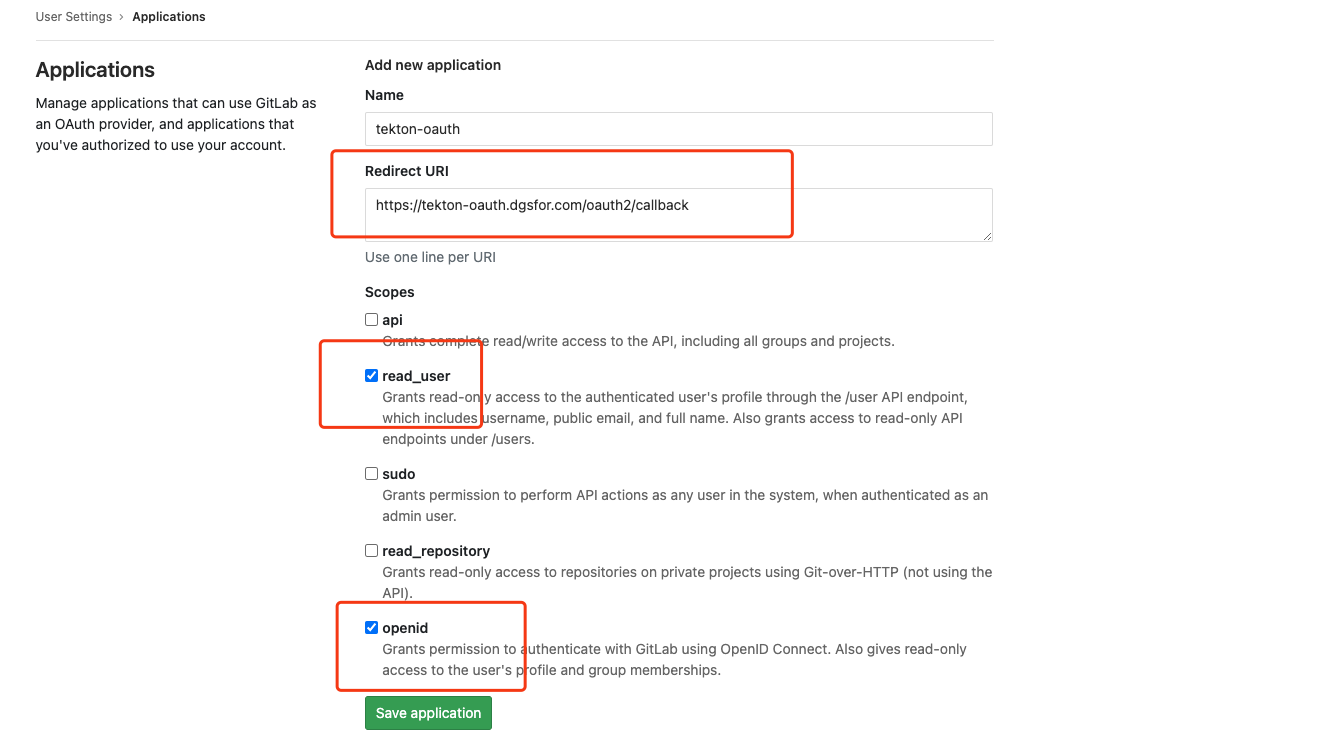
新增github/gitlab app 新增app的时候,需要指定callback url,这里我们固定填写https://tekton-oauth.dgsfor.com/oauth2/callback
1.访问这个网站,去新增一个github app,点击我
2.新增私有化gitlab app,可以如下操作,注意勾选read_user、openid两个scope。
最终我们会得到一个client_id,还有一个client_secret。
安装oauth2-proxy 我们通过helm来安装,我已经封装好了脚本,可以直接使用,分别用github和gitlab两个provider
有几个前提需要做一下:
有了app,拿到client_id以及client_secret
部署好了ingress-controller
新增好了自己的ssl 证书secret
自己gitlab的地址(如果采用gitlab认证),即要设置oidc-issuer-url: https://gitlab.dgsfor.com
github:
1 2 3 4 5 6 7 8 9 10 11 12 13 14 15 16 17 18 19 20 21 22 23 24 25 26 27 28 29 30 # CLIENT_ID and CLIENT_SECRET are the Client ID and Client Secret obtained # when creating the GitHub OAuth application in the previous step CLIENT_ID=xxxxxx CLIENT_SECRET=xxxxxx helm repo add oauth2-proxy https://oauth2-proxy.github.io/manifests helm install -n tekton-pipelines oauth2-proxy oauth2-proxy/oauth2-proxy --values - <<EOF config: clientID: $CLIENT_ID clientSecret: $CLIENT_SECRET extraArgs: provider: github whitelist-domain: .dgsfor.com cookie-domain: .dgsfor.com redirect-url: https://tekton-oauth.dgsfor.com/oauth2/callback cookie-secure: 'true' scope: "user:email" ingress: enabled: true path: / hosts: - tekton-oauth.dgsfor.com tls: - secretName: secret-x-dsgfor-com hosts: - tekton-oauth.dgsfor.com EOF
gitlab:
1 2 3 4 5 6 7 8 9 10 11 12 13 14 15 16 17 18 19 20 21 22 23 24 25 26 27 28 29 30 31 # CLIENT_ID and CLIENT_SECRET are the Client ID and Client Secret obtained # when creating the GitHub OAuth application in the previous step CLIENT_ID=xxxxxx CLIENT_SECRET=xxxxxx helm repo add oauth2-proxy https://oauth2-proxy.github.io/manifests helm install -n tekton-pipelines oauth2-proxy-gitlab oauth2-proxy/oauth2-proxy --values - <<EOF config: clientID: $CLIENT_ID clientSecret: $CLIENT_SECRET extraArgs: provider: gitlab whitelist-domain: .dgsfor.com cookie-domain: .dgsfor.com redirect-url: https://tekton-oauth.dgsfor.com/oauth2/callback cookie-secure: 'true' scope: read_user openid oidc-issuer-url: https://gitlab.dgsfor.com ingress: enabled: true path: / hosts: - tekton-oauth.dgsfor.com tls: - secretName: secret-x-dgsfor-com hosts: - tekton-oauth.dgsfor.com EOF
配置服务暴露 拿github来举例子,我们tekton-dashboard的ingress应该修改成如下:
1
2
3
4
5
6
7
8
9
10
11
12
13
14
15
16
17
18
19
20
21
22
23
apiVersion: networking.k8s.io/v1 kind: Ingress metadata: name: ingress-tekton namespace: tekton-pipelines annotations: nginx.ingress.kubernetes.io/auth-url: "http://oauth2-proxy.tekton-pipelines.svc.cluster.local/oauth2/auth" nginx.ingress.kubernetes.io/auth-signin: "https://tekton-oauth.dgsfor.com/oauth2/sign_in?rd=https://$host$request_uri" spec: rules: - host: tekton-dashboard.dgsfor.com http: paths: - pathType: ImplementationSpecific backend: service: name: tekton-dashboard port: number: 9097 tls: - secretName: secret-x-dgsfor-com hosts: - tekton-dashboard.dgsfor.com
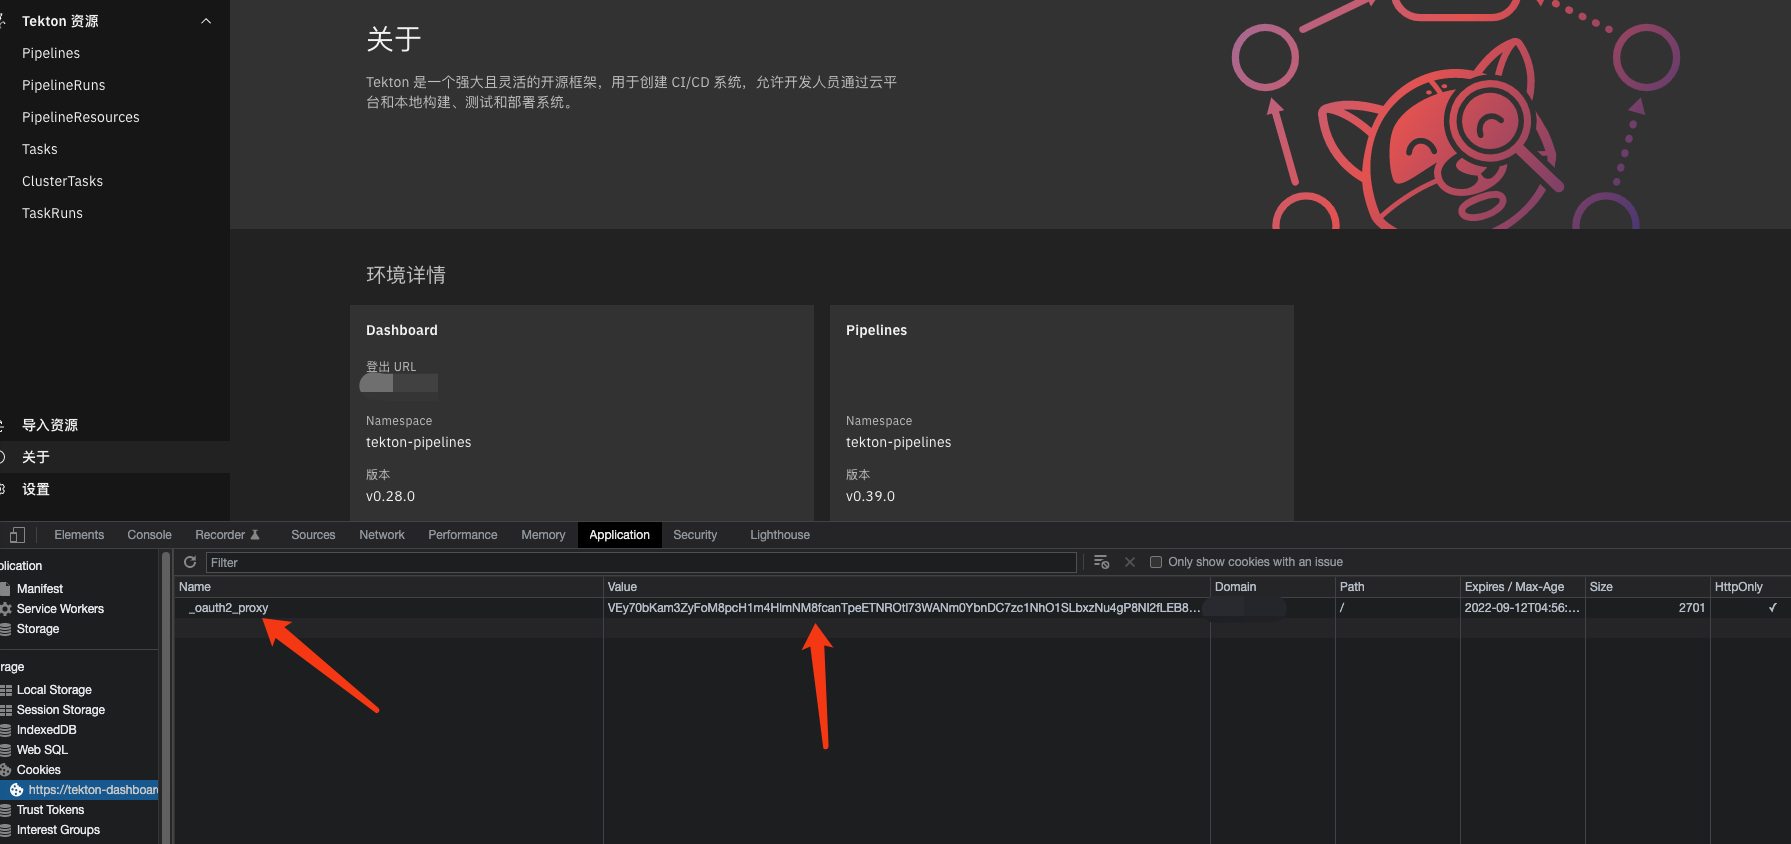
测试 绑定host或者解析你的域名,然后直接访问tekton-dashboard.dgsfor.com,会发现到如下页面
登录成功之后,你会发现一个cookie已经设置成功
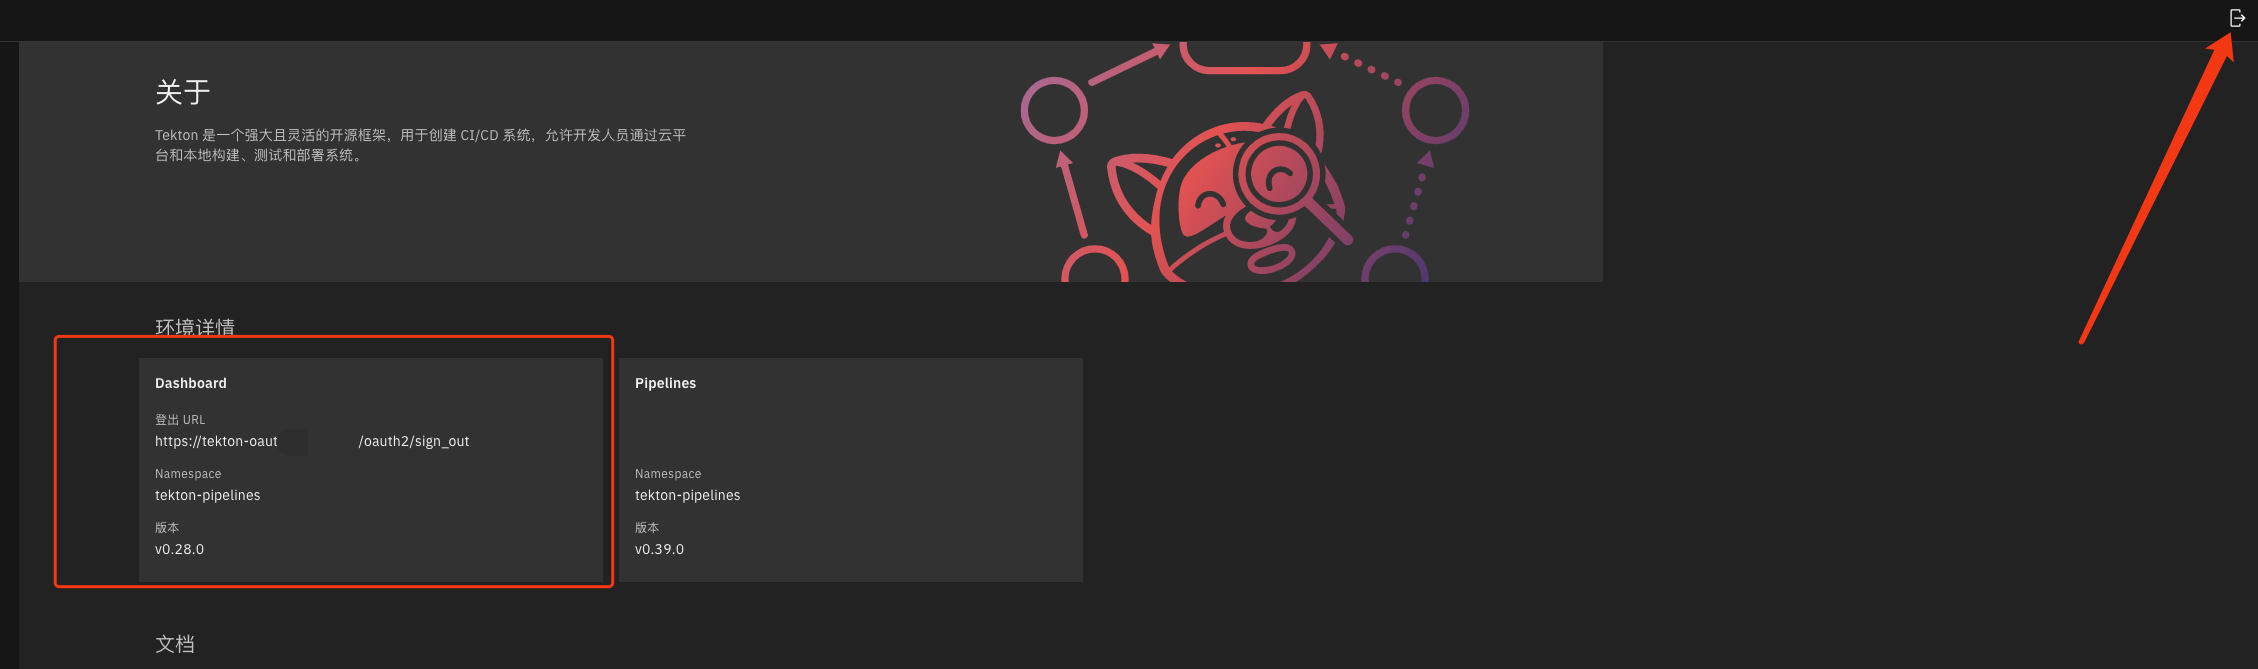
配置logout 配置logout,需要我们修改安装dashboard下载的yaml文件,修改deployment的启动参数:
新增- --logout-url=https://tekton-oauth.dgsfor.com/oauth2/sign_out
1
2
3
4
5
6
7
8
9
10
11
12
13
spec: containers: - args: - --port=9097 - --logout-url=https://tekton-oauth.dgsfor.com/oauth2/sign_out - --pipelines-namespace=tekton-pipelines - --triggers-namespace=tekton-pipelines - --read-only=false - --log-level=info - --log-format=json - --namespace= - --stream-logs=true - --external-logs=
这样页面上就会出现一个退出按钮,退出成功后,也会把cookie清理掉
踩坑
oauth2-proxy升级后,github认证失败问题
这是官方的bug,具体地址 ,可以通过配置--scope "user:email"解决问题。
退出登录之后,会默认跳转到tekton-oauth.dgsfor.com,理论上应该需要跳转到tekton-dashboard.meitu.com然后要求重新登录,目前应该是ingress配置有问题。#2434
注:已经修复,退出登录的时候带上参数即可,详情请看issue
istio环境下,部署oauth2-proxy失败
istio环境下,启用了双向tls,健康检查无法正常工作,看这里: https://istio.io/help/faq/security/#k8s-health-checks
oauth2-proxy建议我们直接关闭健康检查,修改成如下安装配置:
1
2
3
4
5
6
7
8
9
10
11
12
13
14
15
16
17
18
19
20
21
22
23
24
25
# CLIENT_ID and CLIENT_SECRET are the Client ID and Client Secret obtained # when creating the GitHub OAuth application in the previous step CLIENT_ID=xxxxxx CLIENT_SECRET=xxxxxx helm repo add oauth2-proxy https://oauth2-proxy.github.io/manifests helm install -n tekton-pipelines oauth2-proxy-gitlab oauth2-proxy/oauth2-proxy --values - <<EOF config: clientID: $CLIENT_ID clientSecret: $CLIENT_SECRET extraArgs: provider: gitlab whitelist-domain: .dgsfor.com cookie-domain: .dgsfor.com redirect-url: https://tekton-oauth.dgsfor.com/oauth2/callback cookie-secure: 'true' scope: read_user openid oidc-issuer-url: https://gitlab.dgsfor.com livenessProbe: enabled: false readinessProbe: enabled: false EOF
其他问题 当前我们有需求使用多种认证方式,比如同时支持github和gitlab认证,我看了一下文档,当前正式版本不支持,不过在alpha会支持,具体的文档可以看这里: https://oauth2-proxy.github.io/oauth2-proxy/docs/configuration/alpha-config#providers